Deploying a go application and a redis cluster in minikube
[golang kubernetes minikube docker devops redis In my previous post, I wrote a go application that displays the GPS location of any IP address. Here in this post, I’ll explain how to deploy the same in minikube.
- Prerequisites
- Desired Deployment State
- Step 1: start minikube
- Step 2: create secrets
- Step 3: create a redis cluster
- Step 4: create configmap
- Step 5: create deployment and service
- Step 6: check your cluster
- Step 7: expose service
- Summary
- Next steps
Prerequisites
- understanding of kubernetes components (pods, deployment, etc.)
- minikube installed in your laptop
Kubernetes tutorial
If you are new to kubernetes and want to learn, I recommend this youtube playlist.
Minikube
Minikube is a tool that makes it easy to run Kubernetes locally. Minikube runs a single-node Kubernetes cluster inside a Virtual Machine (VM) on your laptop for users looking to try out Kubernetes or develop with it day-to-day.
if you don’t have minikube installed in your laptop, you can do it by following the instructions here.
Desired Deployment State
- 2 instances of our web application.
- a load balancer that balances the load on our two web application instances.
- a redis cluster with a master-slave replication.
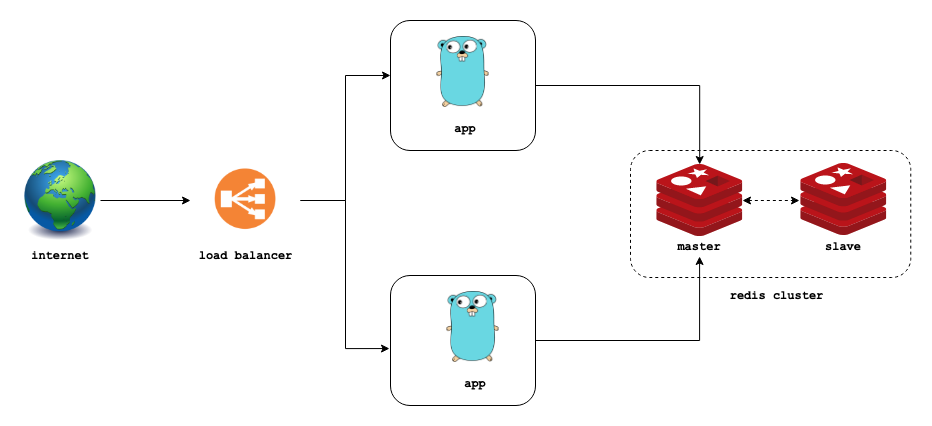 |
|---|
| desired deployment state |
I’m going to list down 7 steps I did to get to the above shown desired state. I hope you can replicate what I did very easily in your own minikube environment.
Step 1: start minikube
minikube start
you should receive an output like this
MacBook-Pro-2:Desktop jeshocarmel$ minikube start
😄  minikube v1.12.3 on Darwin 10.14.3
✨  Using the hyperkit driver based on existing profile
👍  Starting control plane node minikube in cluster minikube
🏃  Updating the running hyperkit "minikube" VM ...
🐳  Preparing Kubernetes v1.18.3 on Docker 19.03.12 ...
🔎  Verifying Kubernetes components...
🌟  Enabled addons: default-storageclass, storage-provisioner
🏄  Done! kubectl is now configured to use "minikube"
To ensure minikube has started successfully, run the command below
minikube status
and you should receive an output like this.
MacBook-Pro-2:Desktop jeshocarmel$ minikube status
minikube
type: Control Plane
host: Running
kubelet: Running
apiserver: Running
kubeconfig: Configured
Before we proceed further, clone the repo (if you don’t have it already) and navigate to the project folder in command line / terminal.
Step 2: create secrets
A Secret is an object that contains a small amount of sensitive data such as a password, a token, or a key. To use a secret, a Pod needs to reference the secret.
We need two secrets for our application setup.
- The apikey for ipstack.com
- A password for our redis cluster.
The password will be used by the redis-cluster when it is setup and it will also be needed in the web app to authenticate with the redis host
First, use a base64 encoding tool to convert your apikey and the intended redis password for your redis cluster to a base64 representation. Here’s an example using the commonly available base64 program:
echo -n 'hello world' | base64
Do the base64 encoding for your apikey and your intended password.
echo -n '2c8dceb807df3f5de79cec85d7255998' | base64 # api key from ipstack.com
echo -n 'sOmE_sEcUrE_pAsS' | base64 # redis password
Create a app-secret.yaml file as below.
Replace the value for apikey and redis-password with the your base64 encoded values.
Run the command below to create the secrets in your kubernetes cluster.
kubectl apply -f app-secret.yaml
You should get an output like this.
MacBook-Pro-2:app jeshocarmel$ kubectl apply -f app-secret.yaml
secret/app-secret created
Step 3: create a redis cluster
To create my redis cluster, I used Helm. Helm is a tool that streamlines installing and managing Kubernetes applications. Think of it like Apt/Yum/Homebrew for K8S. To know more about Helm and Helm charts, I recommend this video.
Run the below command to add the bitnami chart to your helm repo.
helm repo add bitnami https://charts.bitnami.com/bitnami
Create a redis cluster with a single command using helm
helm install my-release bitnami/redis --values minikube_files/values-minikube.yml
The above command creates a redis cluster named ‘my-release’ with configuration parameters mentioned in the file values-minikube.yml.
Run the below command to verify redis-cluster has started successfully.
kubectl get all
You should get an output as below.
MacBook-Pro-2:app jeshocarmel$ kubectl get all
NAME                            READY   STATUS    RESTARTS   AGE
pod/my-release-redis-master-0   2/2     Running   0          2m6s
pod/my-release-redis-slave-0    2/2     Running   0          2m6s

NAME                                TYPE        CLUSTER-IP      EXTERNAL-IP   PORT(S)    AGE
service/kubernetes                  ClusterIP   10.96.0.1       <none>        443/TCP    3m12s
service/my-release-redis-headless   ClusterIP   None            <none>        6379/TCP   2m6s
service/my-release-redis-master     ClusterIP   10.100.3.103    <none>        6379/TCP   2m6s
service/my-release-redis-metrics    ClusterIP   10.103.110.30   <none>        9121/TCP   2m6s
service/my-release-redis-slave      ClusterIP   10.97.70.41     <none>        6379/TCP   2m6s

NAME                                       READY   AGE
statefulset.apps/my-release-redis-master   1/1     2m6s
statefulset.apps/my-release-redis-slave    1/1     2m6s
Kindly wait for a while if Pods are shown as ‘ContainerCreating’
Any pod in the kubernetes cluster can connect to the redis cluster we just created by mentioning the service ‘service/my-release-redis-master’
configuration file explained
The recommended production configuration file by bitnami is available here. I’ve customized this file to accommodate the redis cluster on minikube. The changes that I made are listed here with comments.
  slaveCount: 1 # downgraded slaveCount from '3' to '1'

  networkPolicy:
    enabled: false # change networkPolicy enabled to 'false' from 'true'. This enables the app to discover the cluster easily.
    allowExternal: true # changed networkPolicy allowExternal from 'false' to 'true'.

  password:
    existingSecret: app-secret # mentioned app-secret to retrieve the redis-password we had initially created in step 2
    existingSecretPasswordKey: redis-password # mentioned the key which hold the base64 encoded hash of the password.

  persistence:
    enabled: false # changed persistence enabled to false. minikube doesn't support persistence for redis.
Step 4: create configmap
A ConfigMap is an API object used to store non-confidential data in key-value pairs. Pods can consume ConfigMaps as environment variables.
We need a configmap now to mention our redis host to the pods that are going to deploy the app.
Run the below command to create the configmap.
kubectl apply -f app-configmap.yaml
You should get an output like this.
  MacBook-Pro-2:app jeshocarmel$ kubectl apply -f app-configmap.yaml
  configmap/app-configmap created
Step 5: create deployment and service
Now, create a file app-deployment.yaml and copy the contents from below. The comments on each line mention their intent.
Run the below command to create the deployment and service.
kubectl apply -f app-deployment.yaml
You should get an output like this
  MacBook-Pro-2:app jeshocarmel$ kubectl apply -f app-deployment.yaml
  deployment.apps/go-app created
  service/go-app-service created
This step has created a deployment with 2 pods that run the app and a service on top of it to redirect incoming requests to the 2 pods.
Step 6: check your cluster
Check your cluster by running kubectl get all. I’ve copied my output here for your reference.
MacBook-Pro-2:app jeshocarmel$ kubectl get all
NAME                            READY   STATUS    RESTARTS   AGE
pod/go-app-75d844c66b-ds8h9     1/1     Running   0          5m24s
pod/go-app-75d844c66b-z2279     1/1     Running   0          5m24s
pod/my-release-redis-master-0   2/2     Running   0          6m58s
pod/my-release-redis-slave-0    2/2     Running   0          6m58s

NAME                                TYPE        CLUSTER-IP       EXTERNAL-IP   PORT(S)        AGE
service/go-app-service              NodePort    10.109.157.15    <none>        80:30000/TCP   5m24s
service/kubernetes                  ClusterIP   10.96.0.1        <none>        443/TCP        7m49s
service/my-release-redis-headless   ClusterIP   None             <none>        6379/TCP       6m58s
service/my-release-redis-master     ClusterIP   10.98.39.117     <none>        6379/TCP       6m58s
service/my-release-redis-metrics    ClusterIP   10.102.102.65    <none>        9121/TCP       6m58s
service/my-release-redis-slave      ClusterIP   10.109.163.218   <none>        6379/TCP       6m58s

NAME                     READY   UP-TO-DATE   AVAILABLE   AGE
deployment.apps/go-app   2/2     2            2           5m24s

NAME                                DESIRED   CURRENT   READY   AGE
replicaset.apps/go-app-75d844c66b   2         2         2       5m24s

NAME                                       READY   AGE
statefulset.apps/my-release-redis-master   1/1     6m58s
statefulset.apps/my-release-redis-slave    1/1     6m58s
Kindly wait for a while until the pods are shown as ‘running’
Step 7: expose service
The service we created in step 5 is a NodePort service. A NodePort service is the most primitive way to get external traffic directly to your service. If you are interested to learn more about different services available in kubernetes, I recommend this article.
It’s time now to expose our service. Run the below command.
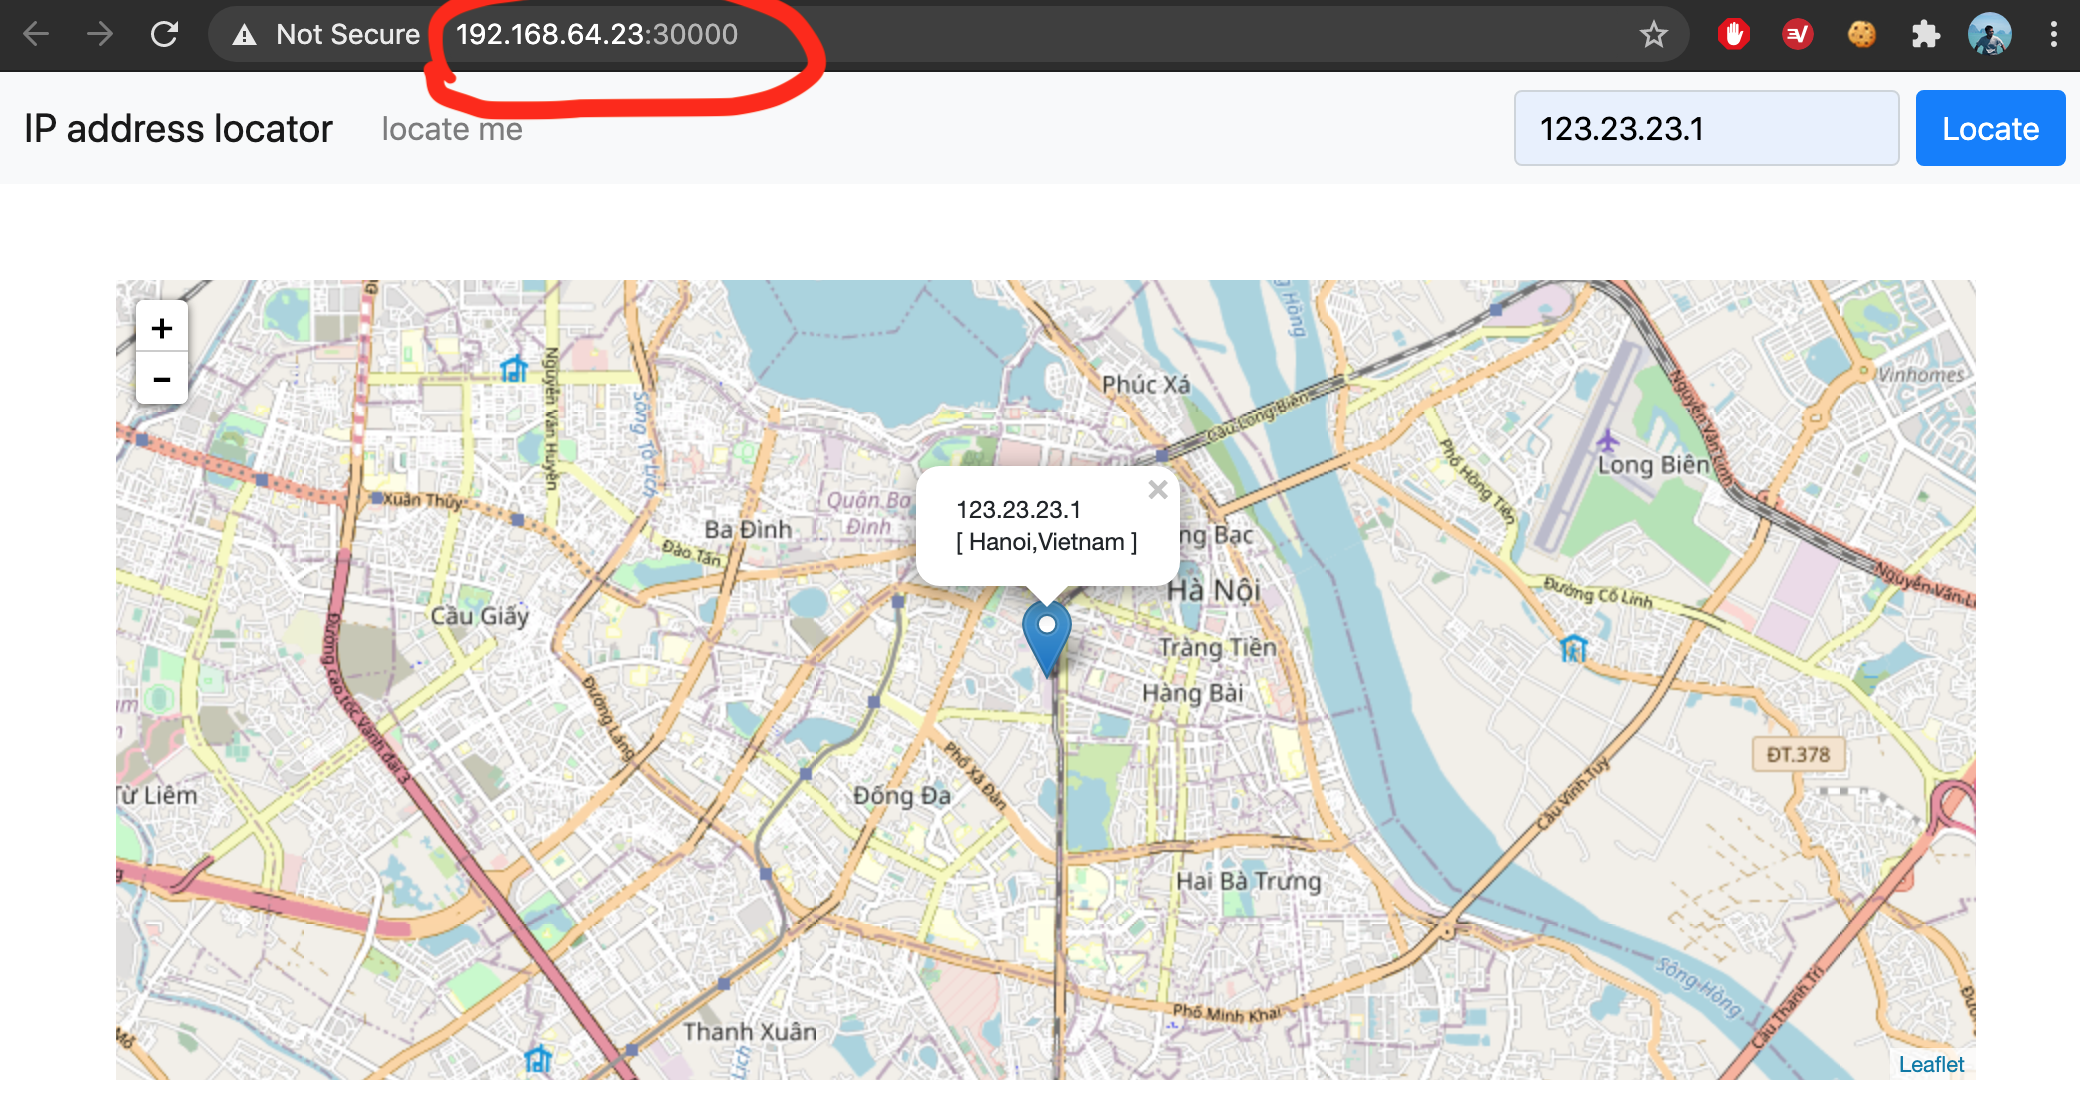
minikube service go-app-service
I’ve copied my output below. You can observe that the port 30000 is the same port we mentioned for NodePort in step 5.
  MacBook-Pro-2:app jeshocarmel$ minikube service go-app-service
|-----------|----------------|-------------|----------------------------|
| NAMESPACE |      NAME      | TARGET PORT |            URL             |
|-----------|----------------|-------------|----------------------------|
| default   | go-app-service | http/80     | http://192.168.64.23:30000 |
|-----------|----------------|-------------|----------------------------|
🎉  Opening service default/go-app-service in default browser...
Copy the URL and paste in your browser. You should be able to see the app now.
 |
|---|
| app loaded on my browser |
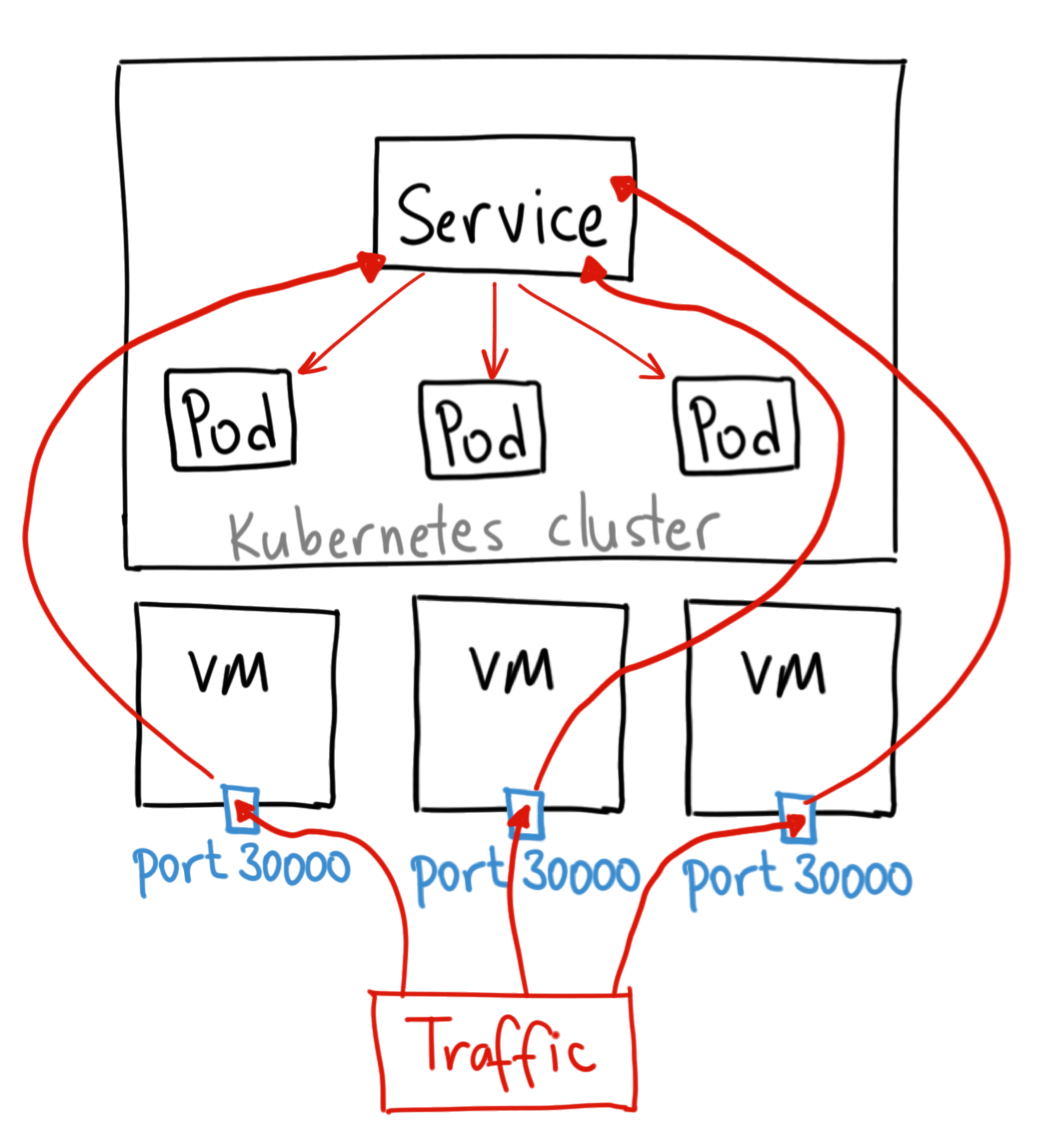 |
|---|
| illustration of how a NodePort works (reference) |
Summary
To summarize, this article demonstrates how to create the following in a minikube kubernetes cluster.
- secrets
- configmap
- a redis cluster using helm
- an app deployment
- a service that exposes the app
As an icing on the top, lets see how to scale our app deployment to 5 replicas.
kubectl scale --replicas 5 deployment/go-app
MacBook-Pro-2:app jeshocarmel$ kubectl scale --replicas 5 deployment/go-app
deployment.apps/go-app scaled
Checking pods after scaling.
MacBook-Pro-2:app jeshocarmel$ kubectl get pods
NAME                        READY   STATUS    RESTARTS   AGE
go-app-69754f67b8-9w7s8     1/1     Running   0          66s
go-app-69754f67b8-b892x     1/1     Running   0          66s
go-app-69754f67b8-hqv2q     1/1     Running   0          42m
go-app-69754f67b8-lrm2r     1/1     Running   0          66s
go-app-69754f67b8-w8xb6     1/1     Running   0          42m
my-release-redis-master-0   2/2     Running   0          78m
my-release-redis-slave-0    2/2     Running   0          78m
The app has been scaled from 2 replicas to 5 replicase in a single command. That’s as simple as it gets. Thanks for your time. Hope you learnt something.
Next steps
In the next post, I’ll write on how to deploy this application in a cloud environment with Linode Kubernetes Engine (LKE). See ya.