Deploying highly scalable apps calmly, comfortably and efficiently with Docker Swarm [part 2]
[docker devops golang redis mysql 
This is part 2 of my earlier post and we will see how to bring our SimpleApp into production in a docker swarm using docker stack.
Contents
Deploying the application in production- Straight road to create a swarm
- Shortcut to create a swarm
- docker-stack.yml
- Stairway to heaven
Scaling our application in production
Deploying the application in production
Before we deploy our app into production, let’s see what docker swarm is.
A Docker Swarm is a group of either physical or virtual machines that are running the Docker application and that have been configured to join together in a cluster. Once a group of machines have been clustered together, you can still run the Docker commands that you’re used to, but they will now be carried out by the machines in your cluster. The activities of the cluster are controlled by a swarm manager, and machines that have joined the cluster are referred to as nodes.
A node is an instance of the Docker engine participating in the swarm.The manager node dispatches units of work called tasks to worker nodes.
There are two ways we can create a docker swarm. The straight road and the shortcut.
Straight road to create a swarm
This can also be called the manual way.
The docker installed in your host machine (Mac / Windows/ Linux) by default is in the stand-alone mode. There are two ways to switch to the swarm mode.
- Your machine becomes a manager and creates a new cluster
- Your machine joins as a node in an already established cluster. Let’s create our own cluster.
You would need 3-5 VMs (EC2/ Google Compute Engines/ Azure Virtual Machines) to establish a proper swarm.
Run this command in one of your instances.
docker swarm init --advertise-addr=<YOUR_IP_ADDRESS_HERE>
Node 1:
[node1] (local) root@192.168.0.13 ~
$ docker swarm init --advertise-addr=192.168.0.13
Swarm initialized: current node (auqbibn9m0re9ywresidedmoz) is now a manager.

To add a worker to this swarm, run the following command:

    docker swarm join --token SWMTKN-1-2eqwgvp8olp8rze3rmi2cny7j7bjtmr75xgbz6nk7fxq70bm3z-bctu4q16wda4yx0j8wdrqrkkc 192.168.0.13:2377

To add a manager to this swarm, run 'docker swarm join-token manager' and follow the instructions.

[node1] (local) root@192.168.0.13 ~
node1 has become a swarm manager. To add a worker node under this manager, all we have to do is to copy the docker swarm join command from output above and run in the VM that you intend to make as a worker.
Node 2:
[node2] (local) root@192.168.0.12 ~
$     docker swarm join --token SWMTKN-1-2eqwgvp8olp8rze3rmi2cny7j7bjtmr75xgbz6nk7fxq70bm3z-bctu4q16wda4yx0j8wdrqrkkc 192.168.0.13:2377
This node joined a swarm as a worker.
[node2] (local) root@192.168.0.12 ~
node 2 has joined the swarm.
Node 3:
[node3] (local) root@192.168.0.11 ~
$     docker swarm join --token SWMTKN-1-2eqwgvp8olp8rze3rmi2cny7j7bjtmr75xgbz6nk7fxq70bm3z-bctu4q16wda4yx0j8wdrqrkkc 192.168.0.13:2377
This node joined a swarm as a worker.
[node3] (local) root@192.168.0.11 ~
node 3 has joined the swarm. I’ve done the same with two other VMs (node 4 and node 5).
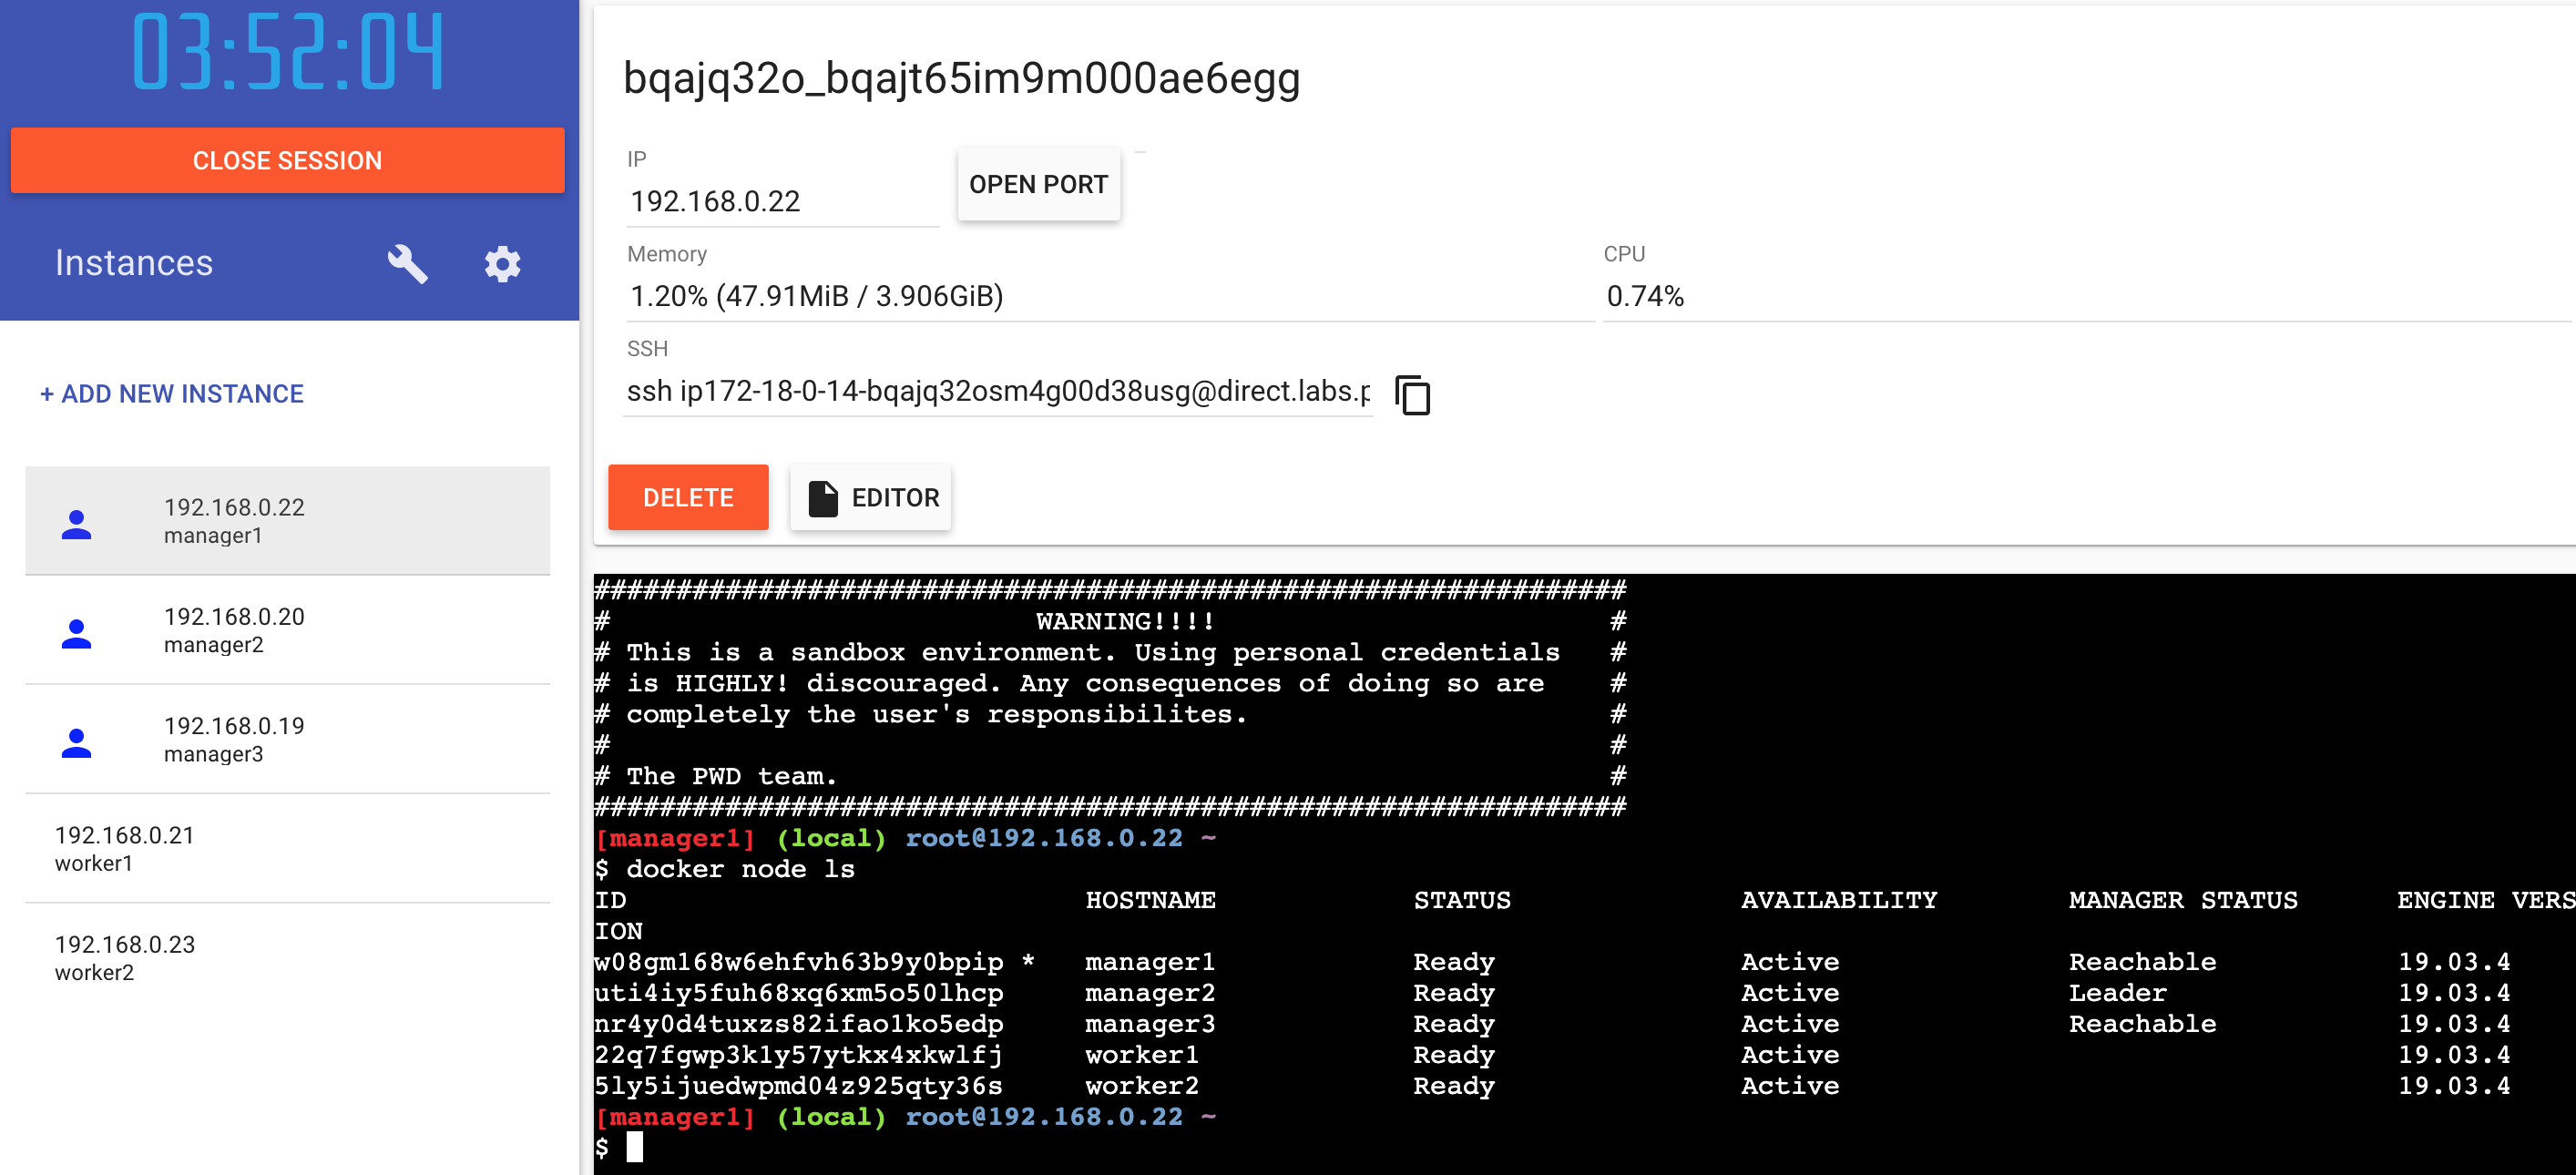
Now to list all the nodes in the swarm run the following command from your manager node (node 1).
docker node ls

You have your swarm ready.
Note: Nodes can only be listed from the swarm manager.
Shortcut to create a swarm
Launch Play With Docker in your browser. This requires a docker account which you can create for free. Once you are in, you can launch your own swarm by choosing one of the pre-defined templates.
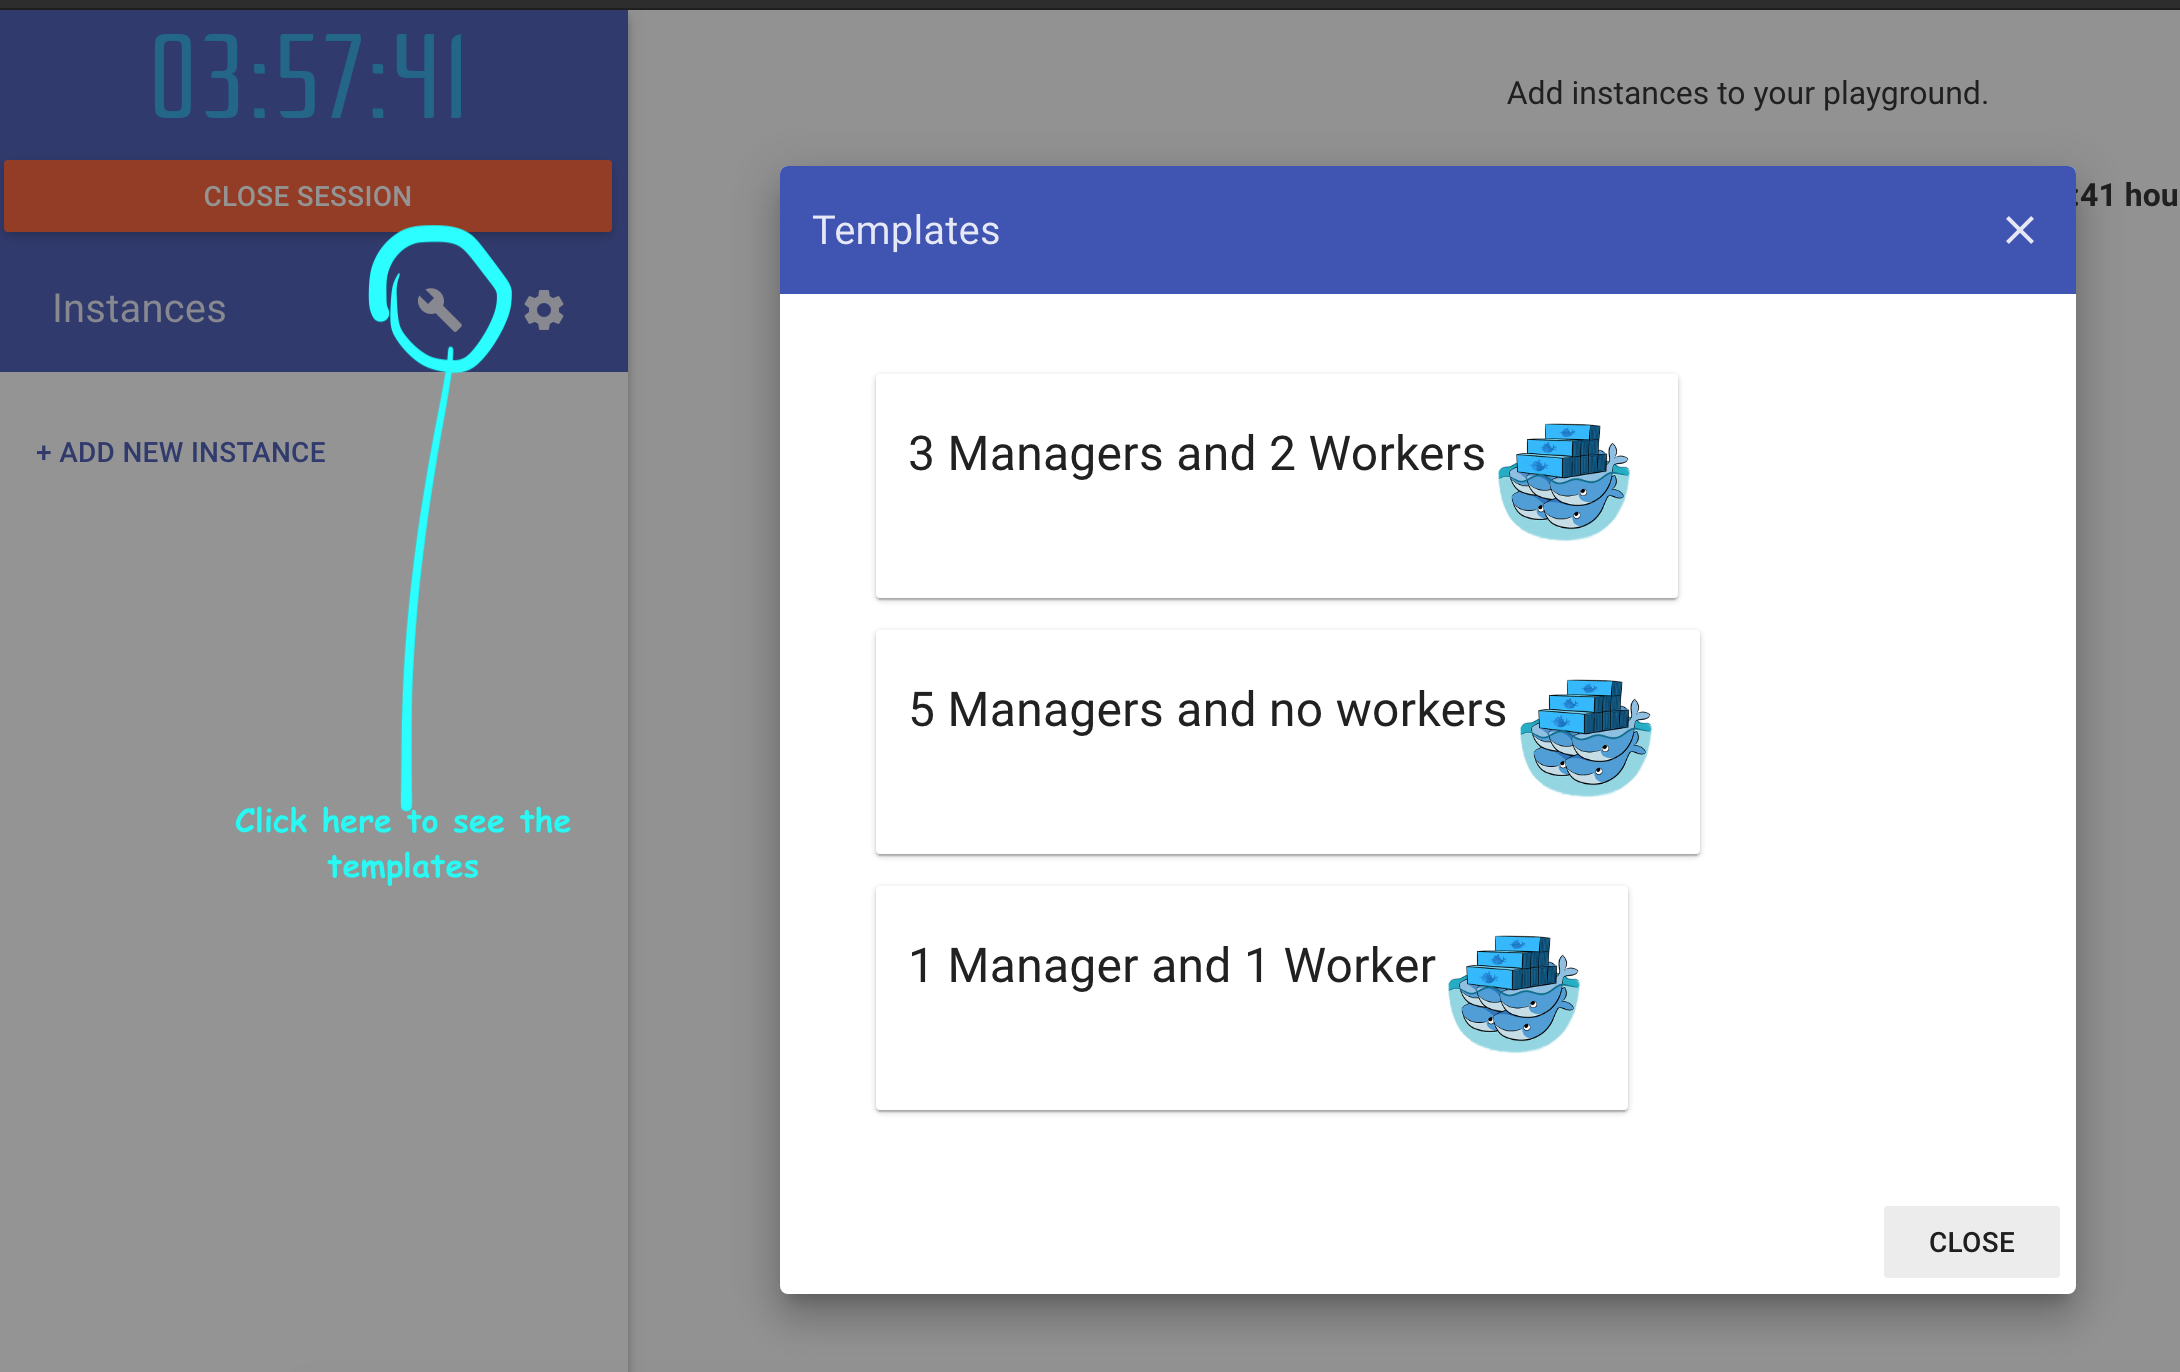
I chose a 3 managers and 2 workers model and swarm is ready within a few seconds. Run docker node ls in one of the manager nodes to verify the same.
docker-stack.yml
Note: The images we built in part1 have been pushed to docker hub and are public. On how to push to docker hub, please refer here
Unlike in our development environment where we used docker-compose.yml, here in production we will be using an other file called docker-stack.yml. Our docker-stack.yml will have a similar layout like our compose file but with a few differences.
- docker-stack.yml doesn’t build the image but rather pulls the image from a repository like docker hub.
- docker-stack.yml has a deploy param for each service that can define the number of replicas needed for it, the restart policy, the update methodology and so on.
- docker-stack.yml defines the secrets which will be setup later in the production environment.
    app:
        image: jeshocarmel/mysimpleapp_app:latest
        depends_on:
           - db
           - cache
        networks:
            - back-tier
            - cache-tier
        secrets:
            - mysql_password
            - redis_password
        environment:
            WAIT_HOSTS: db:3306
            MYSQL_DATABASE: simple_db
        deploy:
            replicas: 2
            update_config:
                parallelism: 2
                failure_action: rollback
            placement:
                constraints:
                - 'node.role == worker'
            restart_policy:
                condition: on-failure
                delay: 5s
                max_attempts: 3
                window: 2m
        ports:
            - "80:80"
        tty: true

secrets:
    mysql_password:
        external: true
    redis_password:
        external: true
The app block in docker-stack.yml.
deploy- specifies configuration related to the deployment and running of services. This only takes effect when deploying to a swarm with docker stack deploy, and is ignored by docker-compose upreplicas- if the service is replicated (which is the default), specifies the number of containers that should be running at any given time.update_config- configures how the service should be updated. Useful for configuring rolling updates.parallelism- the number of containers to update at a time.failure_action- what to do if an update fails. One of continue, rollback, or pause (default: pause)placement- specifies placement of constraints and preferences.restart_policy- configures if and how to restart containers when they exit.secrets- is a feature of docker swarm which helps to send/store passwords among layers with auto-encryption.
By defining our app service as above, we are going to have two replicas of app and with a contraint imposed that these two replicas will only be on the worker nodes and not on the manager nodes.
Stairway to heaven
Note: I’m running a swarm with 1 manager and 4 worker nodes like the one we created in the straight road approach
Step 1: Copy docker-stack.yml to our manager node. As all our images will be loaded from the repository there is no need to copy our codebase. This file alone will do.
[node1] (local) root@192.168.0.23 ~
$ ls
docker-stack.yml
[node1] (local) root@192.168.0.23 ~
$
Step 2: Create two docker secrets mysql_password and redis_password by running the following command
[node1] (local) root@192.168.0.23 ~
$ echo "ithu#thaanda@yen!password" | docker secret create mysql_password -
t4ydcn1n8bb3hkp1ao8akel2h
[node1] (local) root@192.168.0.23 ~
$ echo "foobared" | docker secret create redis_password -
glbp2kui3oncyx8qmqymsz1mm
[node1] (local) root@192.168.0.23 ~
$
Step 3: Run the command below
docker stack deploy -c docker-stack.yml mystack
‘mystack’ is a reference name which we can later use to monitor our deployment
[node1] (local) root@192.168.0.23 ~
$ docker stack deploy -c docker-stack.yml mystack
Creating network mystack_back-tier
Creating network mystack_cache-tier
Creating network mystack_default
Creating service mystack_visualizer
Creating service mystack_cache
Creating service mystack_db
Creating service mystack_app
[node1] (local) root@192.168.0.23 ~
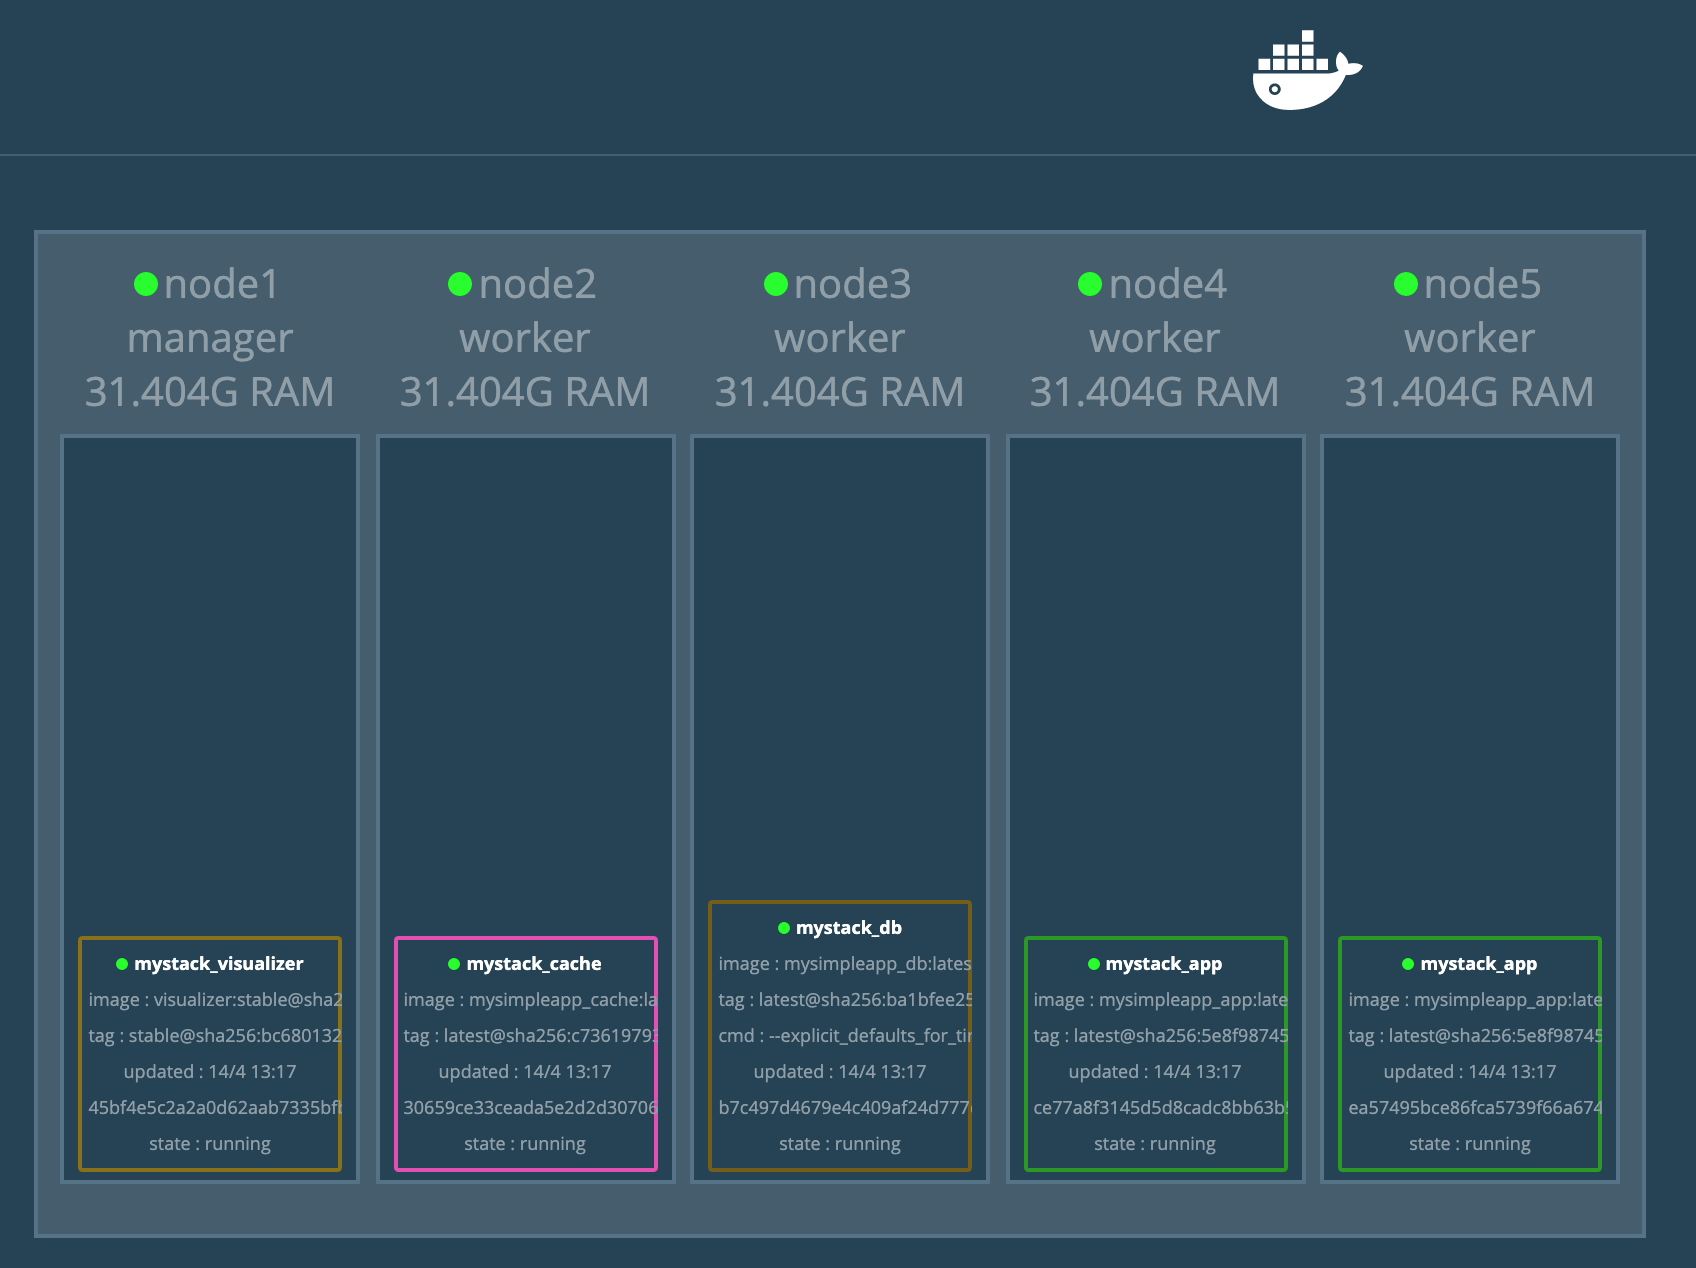
Step 4: Monitor your stack by using the command below
docker stack ps <stack_name>
$ docker stack ps mystack
ID                  NAME                   IMAGE                                  NODE                DESIRED STATE       CURRENT STATE                ERROR               PORTS
mqzxcasdyy3j        mystack_app.1          jeshocarmel/mysimpleapp_app:latest     node5               Running             Running 42 seconds ago
voltu0dcp47c        mystack_db.1           jeshocarmel/mysimpleapp_db:latest      node3               Running             Running about a minute ago
3p3jm7kp4kso        mystack_cache.1        jeshocarmel/mysimpleapp_cache:latest   node2               Running             Running about a minute ago
t1t7g5jw5tjj        mystack_visualizer.1   dockersamples/visualizer:stable        node1               Running             Running about a minute ago
spxmkg92bsaf        mystack_app.2          jeshocarmel/mysimpleapp_app:latest     node4               Running             Running 42 seconds ago
As an icing on the cake I added a visualizer with which we can monitor our swarm. This is accessible on port 8001 in this stack.
Scaling the application in production
This is the easy part. Now suppose I want to scale my app service to 5 replicas (currently 2), I can run the following command.
[node1] (local) root@192.168.0.23 ~
$ docker service scale mystack_app=5
mystack_app scaled to 5
overall progress: 5 out of 5 tasks
1/5: running   [==================================================>]
2/5: running   [==================================================>]
3/5: running   [==================================================>]
4/5: running   [==================================================>]
5/5: running   [==================================================>]
verify: Service converged
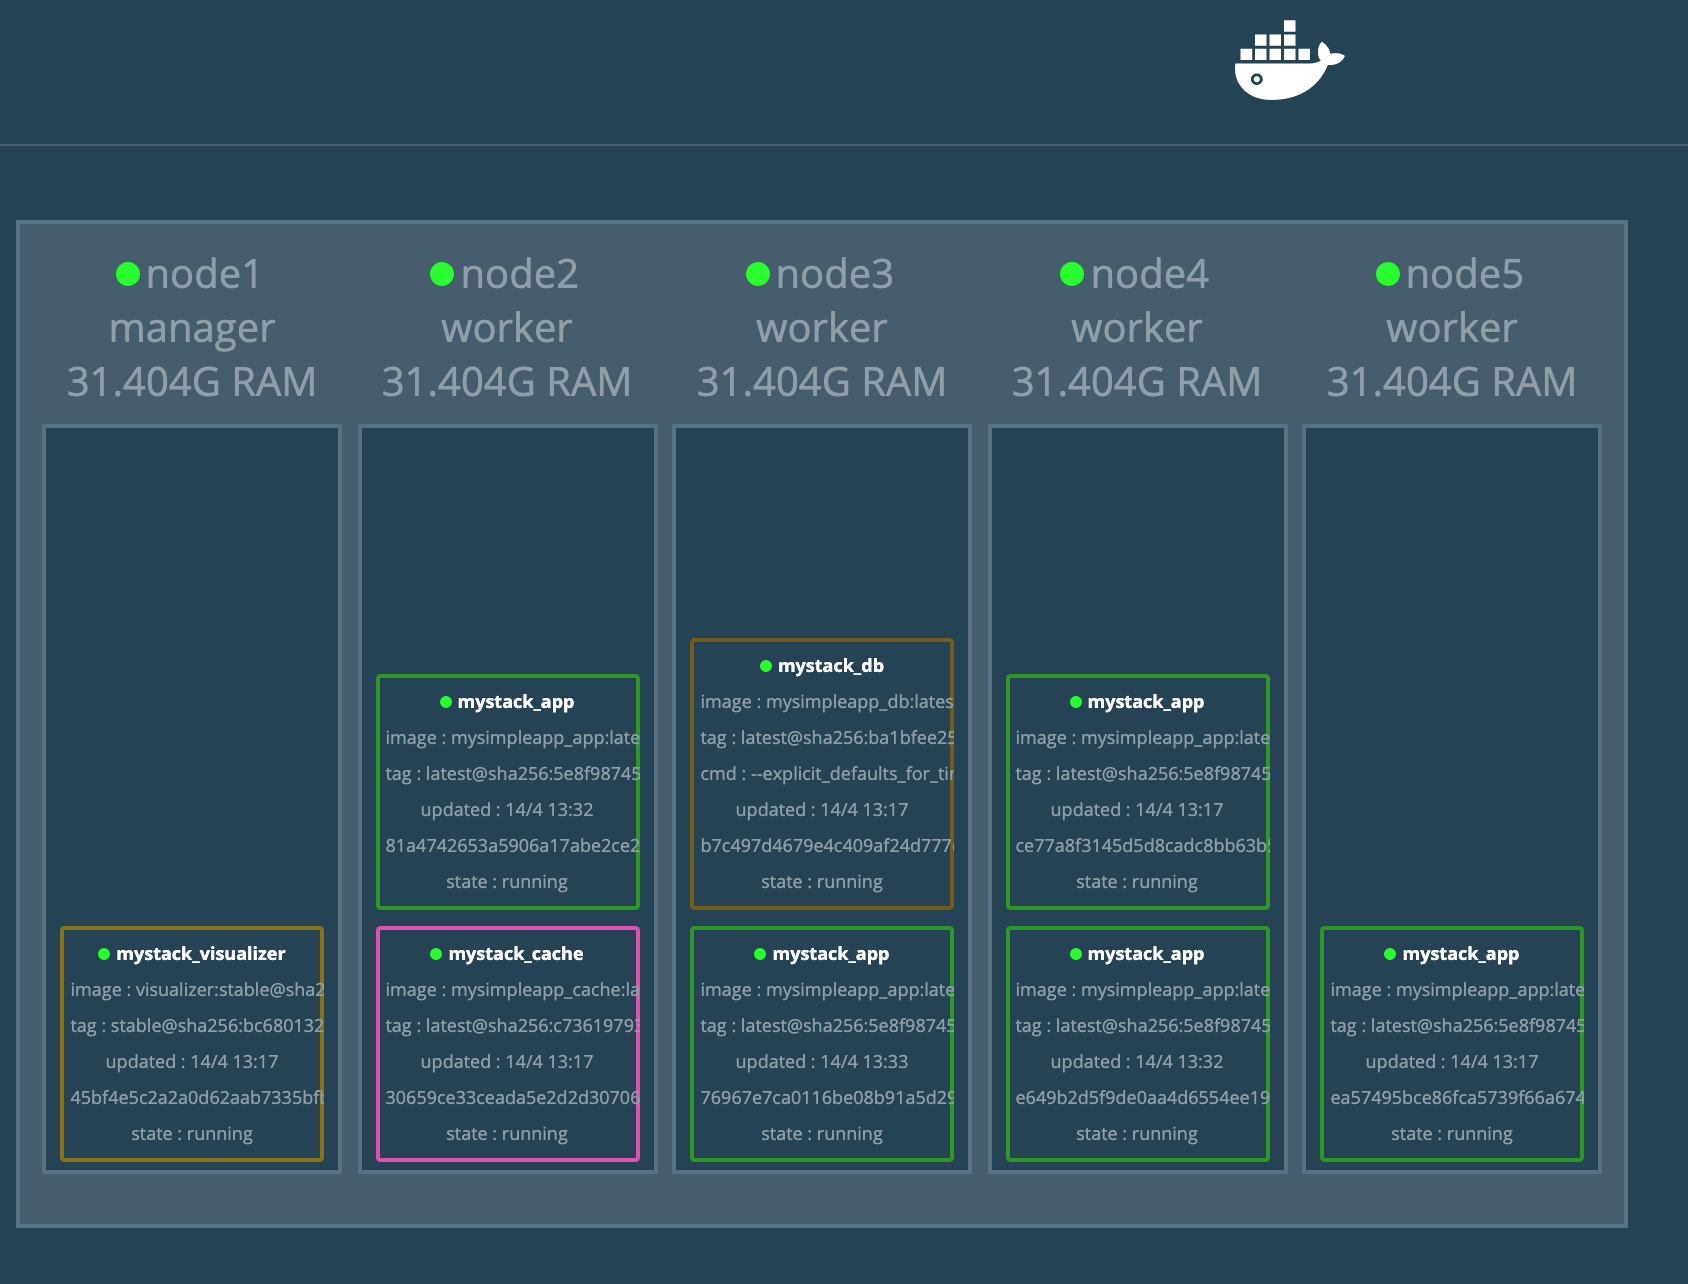
We just scaled our app layer to 5 replicas without any downtime and with a single command. Life’s good isnt’t it?
Summary
- We created a docker swarm (with both long and short approaches).
- We deployed our application with a single file (docker-stack.yml) without any codebase.
- We scaled our application without any downtime and that too with a single command.
- We had a monitoring in place for our deployment along with a restart-policy just in case anything goes wrong.
Docker swarm is good place to start if you are trying to deploy / scale microservices or distributed system quick and efficient.
There are a few loose ends however with this application. One such case would be if we scale our db service to 2 replicas, there can be situations where the replicas are in two different nodes and two docker volumes are created and they have different copies. I’ll show you how to deal with this in a seperate post. Have good day !!